Masscan – Scan the whole internet
How to use masscan to enumerate large number of hosts quickly
Masscan has been around for some time now and already it’s in use by pentesters all around. It’s a reconnaissance tool which can transmit upto 10 million packets per second. It uses asynchronous transmission & a custom TCP/IP stack. So different threads are used for transmission & reception of packets.Masscan can be used to enumerate a large number of hosts very quickly. In fact, the author of the tool claims it can scan the whole internet with 6 minutes. It can be used for stress testing also due to it’s high transmission rate. But special drivers(PF_RING) & NICs are needed to achieve those high rates. One aspect which makes this a convenient tool is that, it interacts with the user very similarly to the style of nmap.
Features
- Ultra Fast port scanning: Transmits upto 10M packets/sec ( Capable- NIC & PF_RING Drivers required)
- Nmap style output
- Nmap style target specification and options
- Banner grabing
- Basic Vulnerability Scanning like Heartbleed
- Custom TCP/IP stack
Uses
- It can be used as a first level recon tool to map the network
- Enumerate a large no of hosts
- Enumerate various subnets inside an organisation
- Enumerating the internet !
- Random scanning for FUN & Knowledge !
This tutorial is organized into the following lab sections
- Selftest
- Scan Google IPs, Banner grabbing from google IP range & output options
- Pausing & Resuming the scan
- Exclude specific Addresses & Misc options
- Putting all together in custom configuration
Lab 1: Selftest
In this lab we test whether the installation of masscan is proper. In case you are not on the latest kali or masscan is not installed, refer to the homepage of the toolCommand: masscan --regresThe above will test whether the installation is proper.

Command: masscan 0.0.0.0/4 -p80 --rate 100 --offlineThis will scan whole IP address subnets but without going into the internet. This wont produce any worthy results but see the time required for the scan when rate is 100 packets/sec.

Command: masscan 0.0.0.0/4 -p80 --rate 10000000 --offline

Lab 2: Scan Google IPs, Grab Banners & Output Results
In this lab, we scan a range of publically available google IPs. First we find out what IP does google resolves to and then we perform port scan on the particular range on ports 80 & 443.Command: host google.comThis gives the IP of google.com webserver. This might differ depending on the location you are.

For eg: If the IP we obtained is 216.58.196.12, we use 216.58.196.0/24 to scan IPs 216.58.196.1-254
Command: masscan 216.58.196.0/24 -p80,443

Now we attempt to grab banners from the IPs we scan. For this we may come across an issue. Since masscan uses custom stack the OS may reject the packet. This is well explained in the home page of the tool. SO for now we need to specify a separate IP address in the same subnet.
For now, My kali has ip address 192.168.1.4. So we need to specify a source IP in the 192.168.1.0/24 range.
Command: masscan 23.92.56.53<replace with tour target IP> -p 80,443 --banners --source-ip 192.168.1.200

Next we save the results into files. This is very similar to that of nmap.
Command: masscan 216.58.196.0/24<replace with yours> -p80,443 --output-format=xml --output-filename=google.xml<replace with yours>Or Else, we can simply specify “-ox”
Command: masscan 216.58.196.0/24 -p80,443 -oX google.xml


Lab 3: Pausing & Resuming a Scan
Suppose you have a very big subnet to scan and you need to pause the scan for some other purposes, masscan automatically pauses the scan when you do a “Cntrl + C”. Also you can resume from it whenever you want.Command: masscan 216.58.0.0/16<replace with yours> -p22,23,80,443<replace with the ports you want> -v --rate=1000 -oX output.xml

Command: masscan --resume paused.conf

I have installed Etherape in kali to visualise. You can use Wireshark or any other visualizers.

Once the scan is finished, you can import the xml to some spreadsheet packages to perform an analysis.

Lab 4: Exclude specific Addresses & Misc options
In this section, we tryout the –exclude option and some other misc options.The –exclude option is very much necessary and important. When you are scanning an organization’s network, there might be some IPs/ranges you are not permited to scan. More importantly, when scanning the internet, you may not want to scan army/defence websites, government websites etc.
For this demo, I scanned my own public IP address range excluding my IP alone.
Command: masscan 180.215.0.0/16 --exclude=180.215.122.120 -p22,23,80,443

1.Shards
You can run multiple instances of masscan for the same range of IPs. When you split the scan into multiple instances, the IPs which are being scanned are separated on the basis of an index number. For example, If you are running 3 instances, the first instance would scan the IPs with index 0, second instance would scan IPs with index 1 & the third would scan IPs with index 3. This feature makes sure that IPs are not overlapped and duplicated in 2 scanning instances. You can even run different instances on different machines also. Below is a small demo:
Environment:
| Name | OS | IP |
| Attacker 1 | Kali Linux | 192.168.1.4 |
| Attacker 2 | Kali Linux | 192.168.1.5 |
| Target | – | 172.217.0.0/16 |
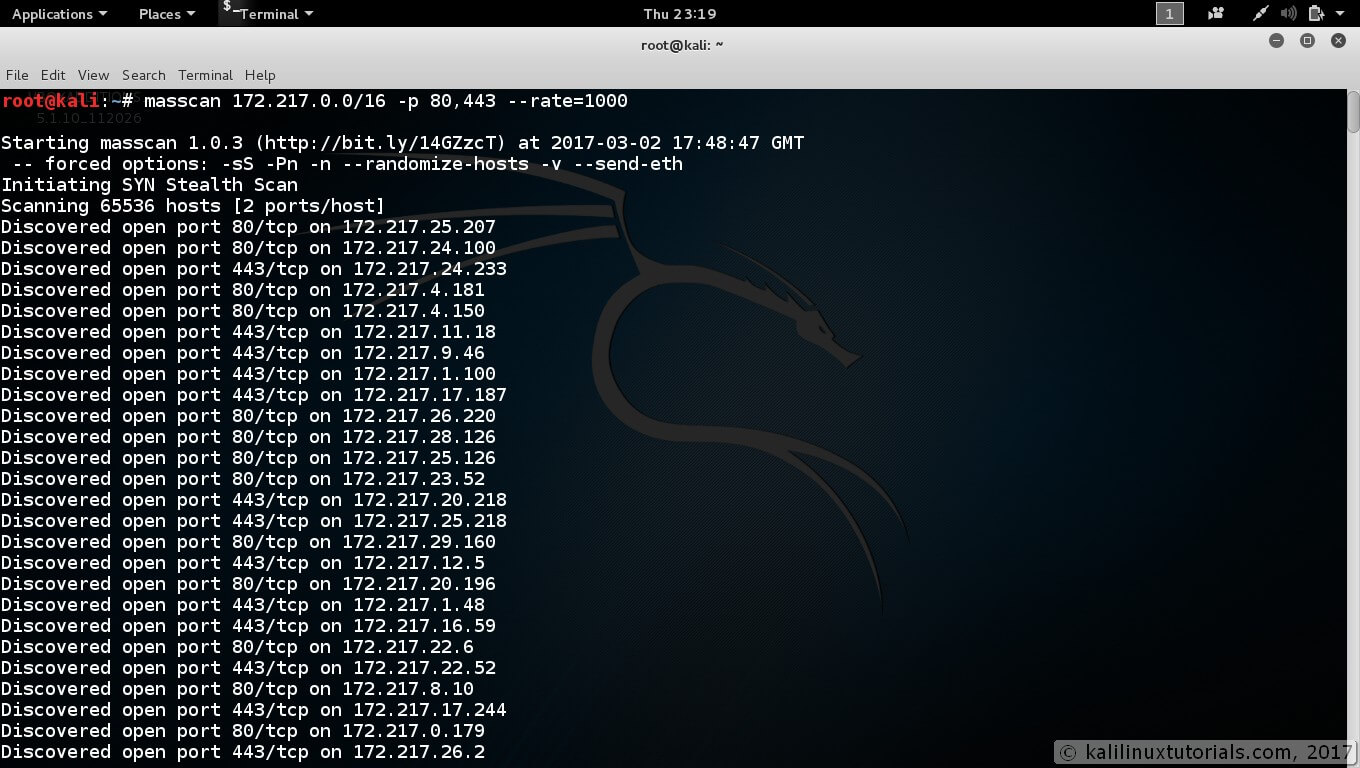
Syntax: masscan <target> <ports> --shards x/y
where x = ID of current instance
      y = Total number of instances
Attacker 1 Command: masscan 172.217.0.0/16 --rate=1 -p80,443 --shards 1/2

Attacker 2 Command: masscan 172.217.0.0/16 --rate=1 -p80,443 --shards 2/2

This option includes an ICMP Echo request also with the scan
Syntax: masscan <target> <ports> --ping

This specifies the rate( in packets-per-second) at which the scan is to be performed. The author claims a range of 0.1(1 packet per 10 secs) to 10000000 (10 Million packets per second) and higher. Also the author claims he achieved following rates in respective OS(s)
Windows = 250000 (250 Thousand Packets per sec)
Unix = 2500000  (2.5 M Packets per sec)
However, if you want to go beyond that, you need an Intel 10 gbps adapter & PF_Ring driver. The author has described in the homepage .
Links to Adapter & PF_RING:
PF_RING: http://www.ntop.org/products/packet-capture/pf_ring/
Adapter: https://www.amazon.com/Intel-Gigabit-Server-Adapter-E10G41AT2/dp/B002OE870U
Syntax: masscan <target> <ports> --rate=x<rate at which you want to scan>4.Adapter IP
The adapter & IP address to use in case of multiple adapters.
Syntax: masscan <target> <ports> --adapter-ip <ipaddress>5.Adapter Port
This option specifies the source port from which the packets are to be transmitted. Default range is 40000-60000
Syntax: masscan <target> <ports> --adapter-port <port/port-range>

6.UDP Scanning
Yes, of course UDP scanning is available in masscan. You can run a UDP scan by just adding a “U” while specifying the ports.
Syntax: masscan <target> -pU:<port>

Lab 5 : Putting all together in a custom configuration
Now it’s time we put all the options together in 1 single config file. Writing a config file for masscan is very straightforward. Following are some of the points to note:- The “–” before option is not necessary & needs “=” after options
- For options which dont need a value(–banners) use option = true
- As always, “#” for comments
Command: masscan -c configHere is a sample configuration file which sums up all what we discussed in this lengthy tutorial
# Adapter
adapter-ip = 10.108.51.130
adapter-port = 5000-5127
rate = 10.00
shard = 1/1

# Targets
retries = 2
ports = 80,443,U:53,U:161
range = 172.217.0.0/16
exclude = 172.217.0.50
exclude-file /root/masscan-exclusion.list

#Output Options
output-format = xml
show = open
output-filename = google.xml

# Scan Options
banners = true
ping = true
Conclusion
Masscan is infact a very powerful recon tool with a known style of syntax & output options. Masscan can be used to enumerate large no of hosts in the beginning stages of a Pentest & using those results we can proceed to service detection using Nmap or proceed to vulnerability scanning using your favourite tool. Anyway, masscan is a fun tool to work with as it can produce results very quickly. But be extremely careful when scanning into the public. Use this tool wisely or you may land in jail and I will not be responsible.Anyway, hope you learned something from this tutorial. If you did please share this article as this took lot of my time & energy to create a tutorial of such detail. Also share your feedbacks on this.
Comments
Post a Comment